
 There are numerous ways to develop blocking diagrams for actor and camera movement. The 3X5 card was the standard for decades, but today Shot Designer by Hollywood Camera Work is quickly moving into the limelight. It’s a tool that many have asked about since my previous blog: Camera Set-Ups and Shot Lists. With all the interest, I decided to review Shot Designer.
The software works on both MAC and PC, as well as iPhone, iPad, and Android. If you’re able to create blocking diagrams one at a time, the software is free on any of the devices. However, once you’ve used it for 30-60 seconds, you’ll want to pay the low price of $19.99 for the professional version that gives you more features and allows you to save your work.
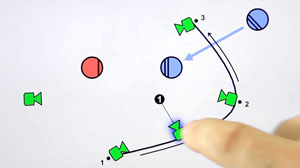
 I downloaded it to my iPad from the app store and made my first blocking diagram complete with sets, cameras, actors and action props in less than 5 minutes (including download time). My second blocking diagram took me 30 seconds. I experimented with my third diagram by adding in numerous camera positions, actor movements, and lighting changes. After 3 minutes I pushed the animation button and watched everything move at the times and speeds that I had predetermined. This greatly simplifies my explanation of a complex set up to the camera crew.
 The software is very simple to use and gives a clean professional look to your blocking diagram. With the simple click of 3 buttons (Share, Current Scene, and Send) an email is sent that includes a .pdf of the blocking diagram, shot list, and a spreadsheet.
The shot list includes: Shot Number, Version, Nickname, Description, Shot Type, Type Code, Lens, Props, Gear, and Crew. While directors don’t need all of that information the DP will love it. And, the Script Supervisor will also appreciate the information in clean typed lists. The shot list is also output in a .csv file that can be quickly pulled into Excel for alterations or editorial reports.
The software allowed me to import background pictures and blueprints, so I could build the blocking diagram over the actual set plans. This gave the added benefit of designing lighting rigs for the lights that wouldn’t need to be moved.
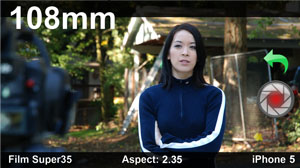 There is an added benefit that allows you to attach storyboards to each camera, which gives the camera department an understanding of what the camera is supposed to see. Additionally, you can attach a director’s viewfinder photo that includes format, aspect ratio, lens and image shot with the mobile device – Making it ideal for location scouts or set walk throughs. The image is captured directly from the camera that is built into your mobile device.
The software was clearly designed for mobile devices and works extremely well on the iPad. At the time of this writing, I hadn’t yet tried the iPhone version, but I did try the MAC version with a touch pad and a Wacom Bamboo pen tablet. Using the pen on the MAC was even more enjoyable and easier than using my finger on the iPad, which was amazing in of itself.
The only issue I had with the MAC version was the lack of keyboard or pen shortcuts. After all, if I had the shortcuts, I could do a diagram in 12 seconds rather than 30. Okay, I know I’m sounding a bit selfish at this point, especially with how easy Shot Designer is to use.
The Shot Designer website has several videos that makes the software simple to understand before purchase. The company is also very friendly and willing to help their customers, but frankly all the questions I could come up with were already answered on their website. I just contacted them to get a feel for their helpfulness and I was very happy with their responsiveness and friendliness.
Since I’m a part of the generation that likes to keep all my documents on my computer, Shot Designer is ideal for me. I no longer have to draw jittery pictures, scan them, and then email mail them out, as Shot Designer allows me to create clean diagrams on my iPad and send them out with three simple clicks.
Since the software is free, I suggest you download it today and start learning how to create great blocking and camera set up diagrams in an easy and professional manner.


